Physical Science Enhancement - Chemistry 3
Oxygen – the ‘acid maker’
The name "oxygen" is derived from the Greek, meaning "acid maker". It was originally thought that all acids contain oxygen, whereas there are many that do not, for example hydrochloric acid, HCl.
However, non-metal oxides, such as carbon dioxide, sulfur dioxide and nitrogen dioxide make acids when dissolved in water.
Content
Scheme of work
C3.1 — The properties of oxygen
Background
Oxygen makes up about one-fifth of the Earth’s atmosphere. It is colourless, odourless and supports combustion, but does not itself burn.
Combustion reactions require oxygen (usually from the air), heat and a fuel source.
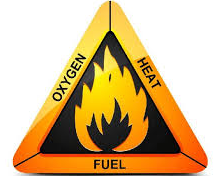
The fire triangle
If insufficient oxygen is present for the total fuel, then the combusion will be incomplete and the products will include less oxidised species. For example, when methane burns in plentiful air or oxygen the following reaction takes place:
CH4(g) + 2O2(g) → CO2(g) + 2H2O(l)
Complete combustion of methane However, if there is restricted supply of air (or oxygen) then the methane cannot fully react and incomplete combustion products, carbon monoxide, carbon microparticulates, can form. CH4(g) + 1½ O2(g) → CO(g) + 2H2O(l)
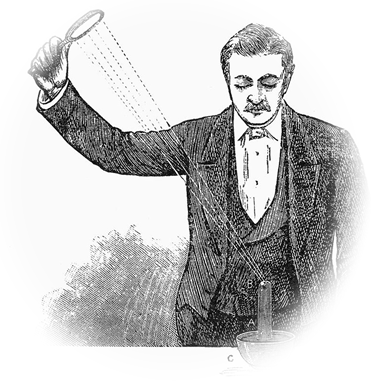
Incomplete combustion of methane In incomplete combustion the carbon monoxide produced is toxic and potentially fatal. Every year there are cases of accidental poisoning and fatalities caused by heating systems that do not burn the fuel completely. Incomplete combustion creates carbon microparticulates, PM10, that show up as dark smoke or fumes. This leads to air pollution and is a major problem in cities and population centres. The pollution is a leading cause of lung disease and cancer. Preparation of oxygen Oxygen may be prepared in the laboratory in several ways. Joseph Priestly first isolated oxygen by heating a sample of mercuric oxide, HgO, using the focussed heat of the sun.
Joseph Priestly's experiment Now we know that there are far simpler means of making oxygen gas in the laboratory. Experiment C3.11 — Preparation and properties of oxygen Apparatus and chemicals Procedure Safety Teacher demonstrations Residue tests Summary Oxygen can be prepared in the lab by catalysed decomposition of hydrogen peroxide. A glowing splint relights in oxygen. Metals and non-metals burn differently: iron produces sparks, carbon forms CO2, sulfur produces choking SO2. The acid-base nature of the resulting oxide (acidic, neutral, insoluble) can be tested with indicators. Check your understanding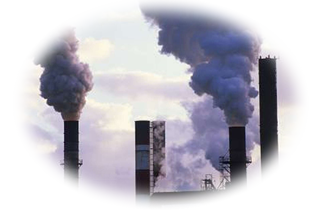
C3.2 — Metal and non-metal oxides
Background
This lesson builds on C3.1, where oxygen was prepared and tested. Here, you will compare how oxides behave in water and with acids. Non-metal oxides such as carbon dioxide typically form acidic solutions in water, whereas many metal oxides are basic and react with acids to form salts and water. You will prepare CO2, choose an appropriate collection method, and show that copper(II) oxide behaves as a basic oxide by reacting with dilute sulfuric acid.
Experiment C3.21 — Metal and non-metal oxides
Carbon dioxide as a typical non-metal oxide and copper(II) oxide as a typical metal oxide
Apparatus and chemicals
- Boiling tube(s), test tubes, delivery tube, rubber bung
- Conical flask for gas generation; trough or beaker of water
- Marble chips (CaCO3) or sodium hydrogencarbonate (NaHCO3)
- Hydrochloric acid (dilute)
- Limewater (Ca(OH)2(aq)) in a test tube
- Copper(II) oxide powder (CuO)
- Dilute sulfuric acid (≈ 0.5–1.0 mol dm−3)
- Heat-proof mat, test-tube holder, small spatula
- Source of gentle heat (if needed to speed CO2 generation)
Procedure
- Prepare CO2: Place a few marble chips (or a spatula of NaHCO3) in a conical flask. Add dilute HCl and quickly fit the bung with delivery tube.
- Choose collection method: Either collect over water in an inverted test tube, or use downward delivery into an upright dry test tube (CO2 is denser than air).
- Test for CO2: Bubble the gas through limewater. Record the observation (turns milky due to CaCO3 formation). Briefly try a small flame near a CO2-filled tube to observe extinguishing.
- Show a basic oxide: Place a small amount of CuO in a test tube. Add warm dilute H2SO4 in portions, swirling until a blue solution forms (CuSO4). Decant/filtrate if solid remains.
- Write balanced equations for each reaction in your notes.
Safety
- Wear goggles and gloves. Dilute acids are corrosive to eyes and skin.
- Handle CuO powder carefully; avoid inhalation. Clean spills promptly.
- Do not inhale CO2. Work in a well-ventilated area; keep flames small and controlled.
- Glassware can become hot; use holders and heat-proof mats.
Choosing a gas collection method
- Over water: simple, but CO2 is somewhat soluble, so yields may be lower.
- Downward delivery: preferred for CO2 because it is denser than air (Mr ≈ 44 vs air ≈ 29).
Summary
Non-metal oxides like CO2 generally form acidic solutions in water. Carbon dioxide can be identified with the limewater test. Many metal oxides behave as bases; CuO reacts with dilute sulfuric acid to give copper(II) sulfate and water. CO2 is denser than air, so downward delivery is an efficient collection method.
Check your understanding
- Explain why downward delivery is usually better than collection over water for CO2.
- Classify each oxide and justify briefly: CO2, CuO, Al2O3.
- Write the ionic reason why limewater turns milky when exposed to CO2.
C3.3 — Oxygen in the air
Background
This lesson links to C3.2 (acidic vs basic oxides). When a small candle burns in a sealed space, oxygen is consumed and carbon dioxide and water are produced. If carbon dioxide is absorbed by dilute sodium hydroxide, the volume change is dominated by oxygen consumption. Measuring the trapped liquid rise after cooling lets us estimate the percentage of oxygen in air.
Experiment C3.31 — Estimate the percentage of oxygen in air
This can be done by allowing a floating candle to burn in an enclosed container and measuring the height change of the liquid
Apparatus and chemicals
- Wide trough or tray with water
- Short candle or tealight on a small floating platform (e.g. foil on a bit of cork)
- 250 cm3 measuring cylinder
- dilute sodium hydroxide solution (≈ 2.0 mol dm−3)
Procedure
- Place the floating candle in the centre of the water tray. Add a few millilitres of dilute NaOH to the water so that any CO2 formed is absorbed when it dissolves into the water under the jar.
- Light the candle. Invert the gas jar over the candle so its rim is below the water surface. Avoid trapping bubbles along the rim.
- Observe: the flame will burn for a short time then go out. Wait at least 2–3 minutes for cooling to occur and for CO2 to be absorbed.
- Mark the final water level on the outside of the jar. Also mark the initial water level (before covering) if not already done.
- Measure the change in water height inside the jar and estimate the fraction of the jar’s internal height that has filled with water.
- Calculate %O2 ≈ (volume fraction replaced by water) × 100%.
Safety
- Wear goggles and gloves. Dilute NaOH is caustic - rinse spills with plenty of water.
- Keep flames small and supervised; tie back hair; no loose sleeves.
- Handle hot glass carefully; wait for cooling before dismantling.
Key chemistry
- Combustion (candle): CxHy + nO2 → xCO2 + y/2H2O
- Carbon dioxide absorption: 2NaOH(aq) + CO2(g) → Na2CO3(aq) + H2O(l)
Notes on measurement
- Wait for the gas to return close to room temperature; hot gases contract on cooling, otherwise you will overestimate the oxygen percentage.
Summary
Burning a small candle in a closed space consumes oxygen. If CO2 is absorbed by NaOH and the system is allowed to cool, the water rise indicates how much of the original air has lost oxygen.
Check your understanding
- Why must you wait for the gas to cool before reading the water level? What error appears if you do not?
- State one design change that would reduce each of these: leaks at the rim; incomplete CO2 absorption; reading uncertainty.
- Your class mean is 18%. Give two likely reasons for the low value and one improvement to approach 21%.
C3.4 — Fire and fuels
Background
This lesson extends C3.3 (oxygen content of air) to fuels and combustion stoichiometry.
Hydrocarbons such as methane burn in oxygen to release energy. The ratio of fuel to air is critical: too little oxygen means incomplete combustion; too much air means the mixture will not ignite well. Explosive limits define the concentration range in which a gas–air mixture can burn. Demonstrations with methane and student inquiry with hydrogen–oxygen bottle rockets illustrate these concepts.
Demonstration — Methane can
This simple and effective demonstration exemplifies the critical explosive ratio of air to methane.
Apparatus and chemicals
- Clean metal can with small hole in the top lid
- Gas inlet tube reaching to the bottom of the can
- Methane supply (laboratory natural gas)
- Ignition source (taper, long match or spark igniter)
Procedure
- Insert the gas tube into the can and allow methane to displace air from the bottom upward for a few seconds.
- Ignite the small hole at the top: initially a small flame appears.
- Turn off the gas and remove the inlet tube. As air is drawn into the can, the flame grows, changes colour, then finally produces a loud “whoomph” when the mixture reaches the critical ratio.
Safety
- Teacher demonstration only
- No students near the can
Experiment C3.41 — Hydrogen/oxygen bottle rockets (student inquiry)
Apparatus and chemicals
- Small plastic bottles (≈250 mL, wide-neck, no screw caps)
- Hydrogen generator (e.g., Zn + HCl) placed well away from ignition zone
- Oxygen source (prepared by catalyst decomposition of H2O2)
- Water trough for collecting gases by displacement
- Launcher tube or push-fit connector
- Safety screen, tape measure, and clear floor “range” area
- Ignition system controlled by teacher (spark, long taper)
Procedure
- Fill bottles with varying H2:O2 ratios (e.g. 1:1, 2:1, 3:1) by collecting gases over water.
- Quickly invert and fit to the launcher under the safety screen.
- Teacher ignites. Observe travel distance and record ratio used.
- Compare results across mixtures and plot distance vs ratio.
Safety
- Only the teacher ignites. Students remain behind the safety line.
- Keep hydrogen generator far from ignition zone. Use small soft plastic bottles.
- Always launch away from people.
Summary
Combustion depends critically on the fuel-to-air ratio. Methane shows a characteristic ignition pattern in the methane can demonstration, while hydrogen–oxygen mixtures in bottle rockets highlight the importance of stoichiometry. The most energetic launches occur close to the stoichiometric 2:1 H2:O2 ratio.
Check your understanding
- Explain why the methane flame changes before the “whoomph” in the methane can demo.
- Why is 2:1 the optimum volumetric ratio for H2:O2 mixtures?
- Give one systematic factor (other than ratio) that may affect rocket distance.
C3.5 — Measuring the energy of a fuel
Background
This lesson follows PS3.O4 on fuels and mixtures. Here, you will measure the energy released by burning different alcohol fuels using simple calorimetry. The aim is to connect combustion enthalpy (ΔHc) with experimental measurements, while recognising heat losses and uncertainty. Spirit burner experiments highlight the difference between theoretical and measured energy values and allow discussion of experimental design.
Experiment C3.51 — Calorimetry with alcohol fuels
The students use the spirit burners to heat up a sample of water with known mass. The mass loss of the spirit burner (equals the mass of fuel used) is also measured.
The data is used to determine the energy released by 1kg of fuel. This is known as the specific energy (energy per unit mass) of each fuel.
Methanol and ethanol fuels are used
Apparatus and chemicals
- Spirit burners with ethanol and methanol fuels (with caps)
- 100 mL graduated cylinder, beaker or metal calorimeter can (≈200 mL)
- Digital balance (±0.01 g)
- Thermometer (±0.5 °C) or temperature probe
- Clamp stand with draught shield (optional: simple foil wind shield)
Procedure
- Measure approximately 100 g (100 mL) of water into a weighed calorimeter/beaker. Record its initial temperature.
- Weigh the filled spirit burner with its lid. Record mass.
- Place the burner under the beaker at a fixed distance. Light the wick and stir the water gently with the thermometer while heating.
- Extinguish after a ~40 °C rise in temperature. Reweigh the burner with lid.
- Repeat with the other fuel. Record all data carefully.
Record the mass of the water
Safety
- Alcohols are highly flammable. Cap burners immediately when not in use.
- Do not refill hot burners. Allow to cool first.
- Wear goggles; keep flames small and supervised. Fire blanket should be nearby.
Key chemistry
- Combustion of ethanol: C2H5OH(l) + 3O2(g) → 2CO2(g) + 3H2O(l)
- Combustion of methanol: CH3OH(l) + 1.5O2(g) → CO2(g) + 2H2O(l)
- Heat absorbed by water: q = m · c · ΔT (m = mass of water, c = 4.18 J g−1 K−1)
- Moles of fuel burned = mass used ÷ Mr. ΔHc ≈ −q / n
Worked example
- Water mass = 100 g; ΔT = 18 °C → q = 100 × 4.18 × 18 ≈ 7.5 kJ
- Fuel mass lost = 0.25 g methanol; n = 0.25 ÷ 32 ≈ 0.0078 mol
- ΔHc ≈ −7.5 ÷ 0.0078 ≈ −960 kJ mol−1 (literature ~−715 kJ mol−1 — difference due to heat loss, incomplete combustion, evaporation)
Design and uncertainty
- Main sources of error: heat lost to surroundings, incomplete combustion, evaporation of alcohol, thermometer resolution.
- Improvement ideas: use a lid, insulate the beaker, minimise flame–can distance, reduce draughts, stir water more uniformly.
- Uncertainty model: add % uncertainties for thermometer, water volume, and mass difference. Convert to absolute error in q and ΔHc.
Summary
Simple calorimetry shows how much energy fuels release when burned. Measured ΔHc values are less exothermic than literature values due to heat loss and incomplete combustion. Careful experimental design reduces these errors. Comparing ethanol and methanol illustrates how molecular structure affects combustion energy.
Check your understanding
- Explain why measured ΔHc values are always less negative than literature values.
- If your thermometer has ±0.5 °C readability and ΔT = 18 °C, what is the % uncertainty from this source?
- Suggest one design improvement that would most reduce heat loss, and explain why.
Now test yourself
Click on the button below to access the self-tests for MYP9 and MYP10.