Physical Science Enhancement - C1 — Water
Content
Scheme of Work
Why water?
Ubiquitous in nature (~70% of Earth's surface; 60–70% of the human body).
Unusual physical properties: liquid at room temperature, high melting/boiling points, ice less dense than liquid.
Universal solvent for many substances; central to chemistry and life.
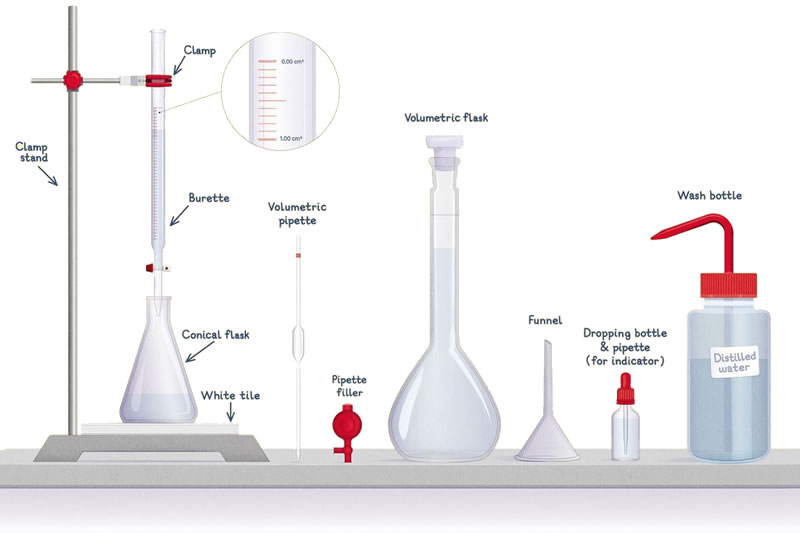
C1.1 - The tools of chemistry
In these lessons you will become familiar with the apparatus and instruments used in chemistry. You will also learn the techniques essential for investigation and experimentation.
You must learn the names of the specific pieces of apparatus, the usual dimensions (i.e. volumetric flasks have sizes ranging from 5 cm3 to 2000 cm3), and their correct use.
Pipettes, burettes & uncertainty
Deliver set volumes with different pipette sizes and from a burette; compare percentage uncertainties and discuss how instrument choice affects data quality.
Activity - measuring volumes accurately
Apparatus
- 10.0 cm3 and 25.0 cm3 pipettes (5.00 cm3 if available), pipette filler.
- 50.0 cm3 burette + stand/clamp; balance (±0.01 g); beakers; wash bottle; distilled water.
Safety
- No mouth pipetting; keep bench/balance dry; handle glass carefully.
Core procedure (concise)
- Pipette 10.0 and 25.0 cm3 water into pre-weighed beakers; weigh to verify delivered mass.
- From a burette, deliver 10.0 and 25.0 cm3 into pre-weighed beakers; weigh.
- Record ambient temperature using a digital thermometer
- Use attached water density table to find the mass of 1.00 cm3 of water.
- Determine the percentage uncertainty for each delivery from instrument tolerances (written on the apparatus).
Estimating Uncertainty
Percentage uncertainty = (instrument tolerance ÷ reading) × 100.
If a 25 cm3 pipette has a tolerance of ± 0.16 cm3, then the percentage uncertainty in the volume that is delivered by the pipette = 100 x 0.16/25 = 0.64 %.
Hence we can state that the uncertainty in the volume delivered = ± 0.64%.
Add percentage contributions (volume ±, balance ±) for a quick combined %.
Convert to absolute uncertainty applied to the "answer", ensuring appropriate significant figures and precision.
Smaller delivered volumes give larger % for the same absolute tolerance.
Summary
- Instrument choice sets the floor for your measurement quality.
- Reporting with % uncertainty makes data comparable across groups.
Check your understanding
- Which delivery had the largest % uncertainty and why?
- How does using a 5.00 cm3 pipette instead of 25.0 cm3 affect % uncertainty?
- Why should the meniscus be read at eye level?
C1.2 — Physical properties of water
Water has both interesting physical properties as well as chemical properties.
It has an unusually high melting and boiling point when compared to substances of similar relative mass. It also had the unusual property of a maximum density while liquid. This means that ice always forms at the surface of water, leaving warmer water below.
Building on 1.1 (measurement quality), in this lesson you will produce a heating curve for crushed ice to water using a probe and loggerPro, data logging software.
Activity - The freezing point of water
Group setup & key equipment
- Crushed ice + splash of water; small beaker; temperature probe + data logger; hot plate or warm water bath.
Safety
- Care with hot plates and Bunsen burners.
Procedure
- The ice must be obtained from the freezer
- Insert probe into ice slurry; log temperature vs time through melting into liquid water.
- Identify the plateau region.
- Estimate the melting/freezing point of ice/water from the flat region.
Summary
- The flat region of the graphed data (plateau) is when the energy is being used to change the state at constant temperature.
Check your understanding
- What does the plateau reveal about energy changes at 0 °C?
- How could you reduce random scatter in your heating curve?
- Is melting a physical or chemical change? Explain briefly.
The boiling point of water
Determine the boiling point of water using the capillary (Siwoloboff) method in a glycerine bath.
The boiling temperature of a liquid is the temperature at which the vapour pressure of the liquid equals the ambient atmospheric pressure. Consequently it is dependent on the ambient pressure. Boiling points are recorded at atmospheric pressure (101.3 kPa) for comparison.
The boiling point of a liquid is a characteristic property that can help in the identification of the liquid.
Activity - Determine the boiling point of water by Siwoloboff
Group setup & key equipment
- Small test tube; Siwoloboff capillary (sealed-end down); glycerine bath; thermometer/probe; hot plate; clamp/stand.
Safety
- Hot glycerine burns—heat slowly; avoid splashes; goggles on.
Core procedure (concise)
- Heat gently: record T when a continuous stream of bubbles appears.
- Cool: record T when bubbling just stops.
- Repeat until no further change in temperature.
Summary
- Boiling point depends on external pressure; lab results will differ from 100 °C.
- Alcobendas (Madrid) is at an altitude of about 700m above sea level. The "normal" atmospheric pressure in Madrid is usually about 94 kPa. (see example below 27/08/2025)
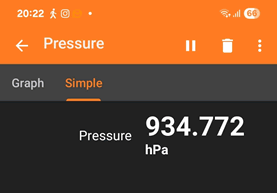
Atmospheric pressure shown in hectaPascals (Pa x 10-2) hPa
Check your understanding
- Why take both heating and cooling readings?
- How might a low-pressure weather system affect your measured Tb?
- Suggest one way to reduce uncertainty in this method.
C1.3 — Relative mass and the mole concept
Relative measurement.
We use relative measurement for many concepts in science. This allows easy standardisation and better communication worldwide. In fact, there are few absolute (not relative) measurements used.
- The kilogram is measured relative to a large mass in a museum in Sevres, France ("le gran poid")
- The metre is measured relative to the distance travelled by light in 1 sec. (specifically 1/299,792,458 s)
- Temperature in Celsius is measured relative to the triple point of water.
- etc.
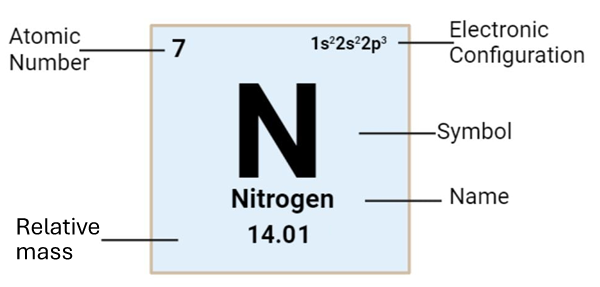
Relative mass
The masses of the particles that make up matter (atoms, molecules, ions, sub-atomic particles) are all incredibly small in SI units.
The mass of one carbon atom = 1.99 x 10⁻²⁷ kg
To make life easier, we define a new unit of mass - the relative mass unit, in which the mass of one carbon atom of a specific isotope, carbon-12, is assigned a value of exactly 12.0000. As the measure is "relative", there are no units, although sometimes the terms relative mass units is used.
This allows us to measure the mass of all small particles compared to the mass of a carbon-12 isotope.
The relative mass concept
The mass of a helium atom is one third of that of a carbon-12 atom, therefore helium atoms have a relative mass of 12/3 = 4
The mass of an oxygen atom is one and one third times as massive as a carbon-12 atom, so it has a relative mass of 16.
The relative masses of the atoms of the elements of the periodic table appear next to each atom.
The relative mass of molecules
Molecules are made up of atoms, therefore we can express the relative mass of a molecule by simply adding up the masses of the atoms that make up the molecule.
The relative mass of water
Water has the formula H2O as the smallest particles, the water molecules, each contain two hydrogen atoms and one oxygen atom chemically bonded together.
The relative mass of water = 1 + 1 + 16 = 18.
Test yourself on relative mass
The mole concept
The mole (unit, mol) is the number of particles whose mass is equal to the relative mass expressed in grams.
As all relative masses refer to the carbon-12 atom, then the number of particles in one mol of any substance is always the same. This number is called Avogadro's number.
Avogadro's number is 602,230,000,000,000,000,000,000
This can be written using scientific notation as 6.02 x 10²³
Working with moles
To calculate the number of moles of particles of any substance, you must divide the mass of the substance by its relative mass.
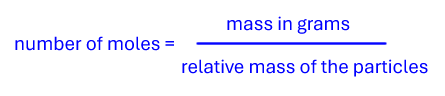
Determine the moles of water in 1.8g
The relative mass of water = 18
The mass of 1 mol of water = 18g
In 1.8 g of water there are 1.8/18 mol = 0.1 mol of water molecules.
Summary
- The relative mass system allows us to express the small masses of atoms, molecules and ions as numbers relative to the mass of one carbon-12 atom
- The mole is the number of carbon-12 atoms in 12g of carbon.
- The mass of 1 mole of any substance is equal to the relative mass in grams.
C1.4 — Solution concentration & molarity
Solution concentration
A solution is formed when a solute is dissolved in a solvent. In practical terms this almost always involves a solid solute and water as the solvent.
Solution concentration is defined by the amount of solute dissolved in a certain volume of solution.
It may be measured in grams/100cm3, grams per litre, or some other measure of mass and volume.
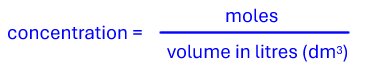
However, as we now know that the numbers of particles of any substance can be calculated using the mole concept, it makes sense to measure solution concentrations in moles per litre, mol dm-3. This is called the solution's molarity. Molarity is always measured in mol dm-3
This just requires one more step in the solution calculation.
- Preparation of a molar solution
- Weigh out a determined mass of solute
- Divide the mass by the relative mass to obtain the moles
- Dissolve in a small volume of water
- Transfer to a volumetric flask and make up to the mark with water.
- The concentration is given by mol/volume (dm3)
Student activity
Apparatus and chemicals
- Analytical/bench balance (±0.01 g); weighing boat/spatula; 100.0 cm3 volumetric flask + funnel; beaker; wash bottle; chosen solute.
Safety
- Avoid spills; clean bench; dry glassware; label all solutions clearly.
Core procedure
- You are required to prepare 100cm3 of 0.1 mol dm-3 copper(II) sulfate solution.
- Calculate required mass for target molarity and volume.
- Weigh solute; dissolve; transfer quantitatively; make to the mark; invert to mix thoroughly.
- Label with substance, concentration, date, initials.
Determine the uncertainty in your solution concentration by calculating the inaccuracy percentage at each step of the preparation.
How could you determine the actual concentration of the prepared solution?
The solution should be saved for the next activity.
Summary
- Accurate solution preparation depends on careful weighing and making to volume.
- Concentration should be reported with an uncertainty estimate.
Check your understanding
- Define solute, solvent, solution, and molarity in one sentence each.
- Where could systematic error arise during solution preparation?
- Why invert a volumetric flask several times after making to the mark?
C1.5 — Solution preparation
Dilution is a standard method of preparing solutions of lower concentration from ones of higher concentration.
Dilution involves measuring out an accurate volume of the stock solution, transferring it to a volumetric flask and making up to the mark with water, ideally, distilled or deionized water should be used.
Students often try to measure out unfeasible volumes of solution rather than carry out easy dilutions. It is important to understand that science does not require whole numbers!
Example: Diluting by a factor of 10
A 25cm3 aliquot (portion) of the stock solution is pipetted into a 250 volumetric flask.
The volumetric flask is then filled to the mark with distilled or deionized water.
The volumetric flask is inverted several times to mix the contents thoroughly and labelled with the new concentration.
The amount of solute is determined using the relationship:
mol = concentration x volume (dm3)
Activity: Dilution of a stock solution
Apparatus and chemicals
- Stock standard solution (the copper(II) sulfate solution prepared in the previous activity); pipettes (10ml, 25ml, 50ml); volumetric flasks (100ml, 250ml); balance; beakers; conductivity apparatus.
Safety
- Standard PPE
- Careful handling of glassware
- Copper(II) sulfate is toxic.
Procedure
- Plan a dilution series (each group targets a different concentration).
- Prepare dilutions; measure chosen property (e.g., density) for each.
- Determine the absolute inaccuracy of each solution.
Summary
- Dilution planning links calculation to practical volume handling.
- Trends across pooled data strengthen conclusions.
Check your understanding
- Rearrange C1V1 = C2V2 to solve for V1.
- Which sources of uncertainty affect the final concentration the most?
Now test yourself
Click on the button below to access the self-tests for MYP9 and MYP10.